How to get SSL certificates on Synology
Table of Contents
I have been working with Synology Disk Station products for SOHO for a long time now. It’s a costly NAS but worth it because of: the combination of high-quality software (DSM) and hardware, and it is friendly for newcomers and professionals alike.
By default, Synology offers access to the NAS UI via HTTPS or HTTP protocol.
While HTTP is the simplest option, HTTPS (if done properly) is much more secure. However, the self-signed certificate, provided by Synology is not good neither in terms of security or user experience (ie: RED alerts in browsers and etc).
In general, in DSM 7 you may issue a certificate by two methods:
- request a free certificate from Let’s Encrypt
- import already existing certificate
The first option is available only in case you exposed your Synology to the public internet which might not be the best idea in terms of security.
In this article, I would like to share an approach on how to secure a connection to the Synology by issuing a valid (!) certificate without exposing NAS to the outer world.
Photo by Jornada Produtora on Unsplash
Instead of relying on DSM embedded functionality, we can obtain the Let’s Encrypt certificate using the DNS-01 challenge: briefly speaking it’s a way how to prove ownership of the domain by modifying the DNS record. Very useful in closed or internal networks with limited public access.
#
Requirements
- DNS credentials for supported provider. In this article I will rely on Cloudflare, however, it is just a matter of configuration variables.
- Installed Docker on Synology: from the link you need only till ‘Downloading Docker Images’ section
The last step, which actually could be done, after all, is to set a proper DNS record, pointed to your Synology private IP (ex: 192.168.1.234). For the article, I will use ds.example.com.
It could be done by:
- setting record in hosts files (quick & dirty)
- setting A record in DNS provider (better)
#
Installation
I made a utility called syno-cli which is distributed as single binary for x86_64 and arm64 platforms. Also available in Docker Hub and GHCR.io registries.
The tool can do multiple things, however, certificates auto is important for us because in this mode syno-cli will: automatically register an account in Let’s Encrypt, issue or renew certificates (via DNS-01), and automatically install certificates to Synology certificates store
From the birds eye level the procedure is pretty straightforward:
- pull image (don’t forget to pick right tag -
latesttag intentionally not provided) - run image with the correct configuration
- assign the automatically created certificate in Synology to the required service (ex: DSM UI)
##
Pulling Docker image
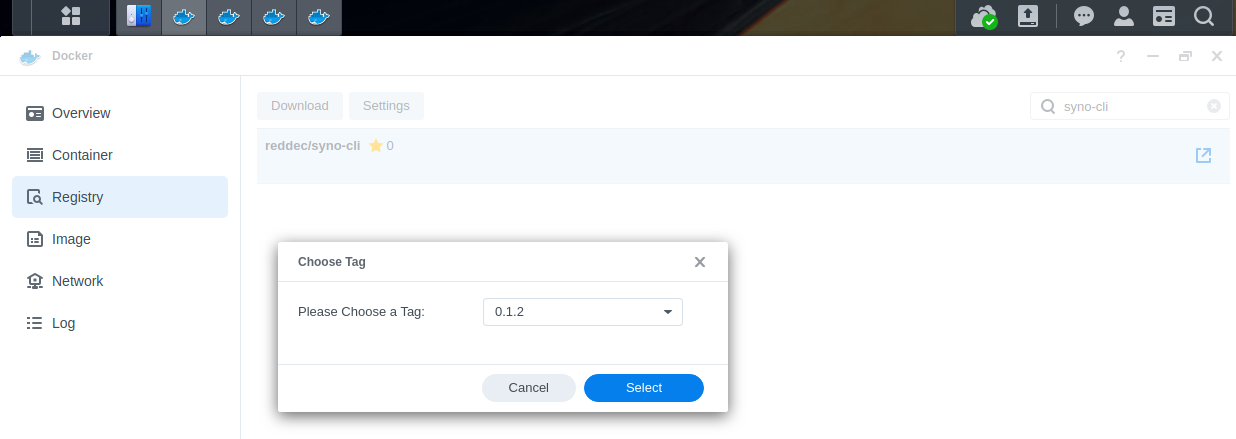
- Open Docker UI, go to Registry page
- search for
syno-cli - ensure that repo is
reddec/syno-cli - double-clik on repo
- pick latest version (
0.1.2on time article wirtten) - push button select
##
Creating container
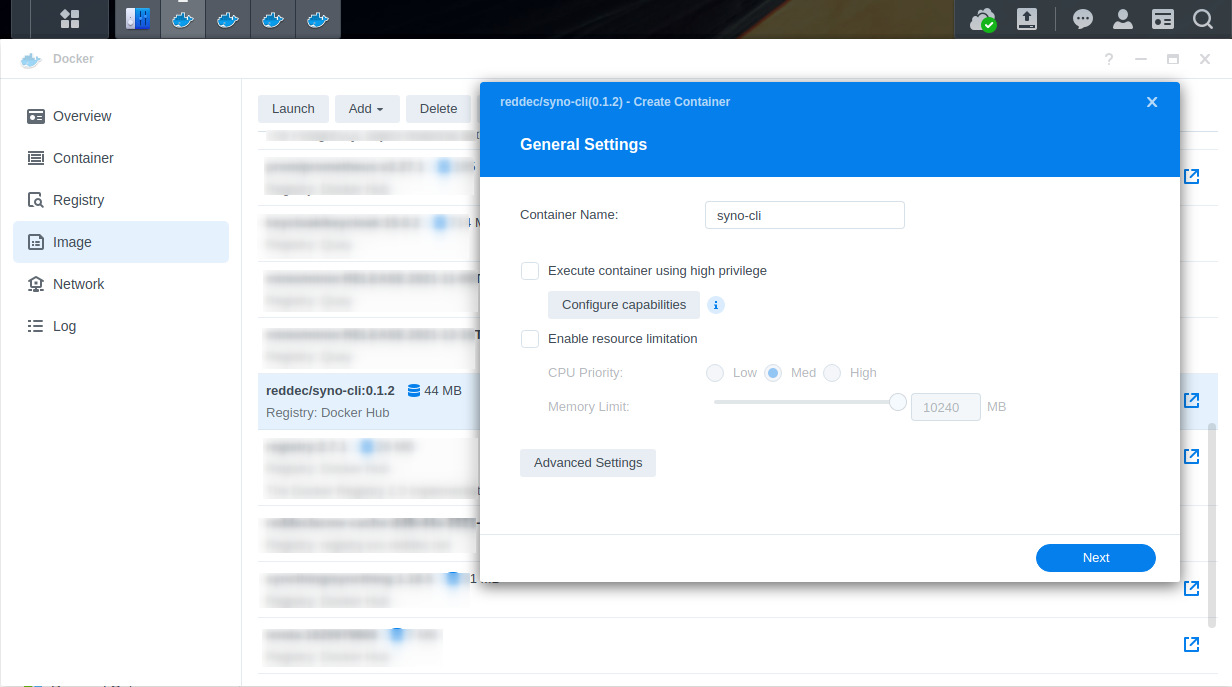
- In Docker UI, go to Image page
- double-click on downloaded
reddec/syno-cli - In container name write
syno-cli(it’s not mandatory, but to keep aligned with article) - Push ‘Advanced Settings’
##
Configuring storage
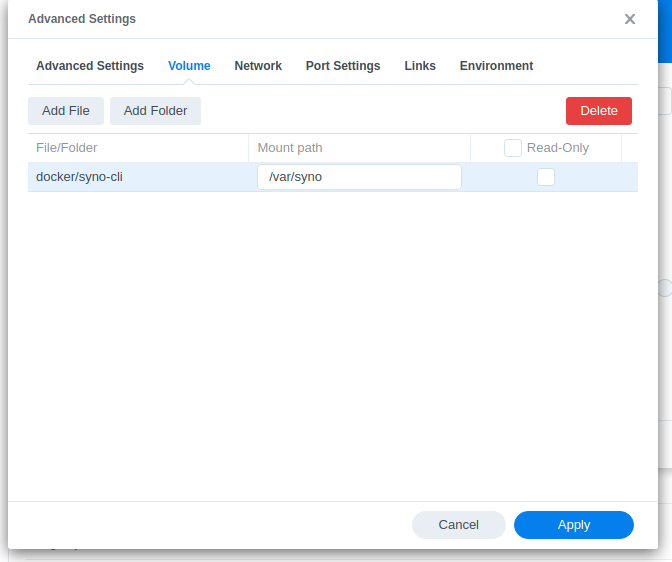
To persist certificates and accounts we need to create a directory and mount it to the container. In my case I created a directory docker/syno-cli.
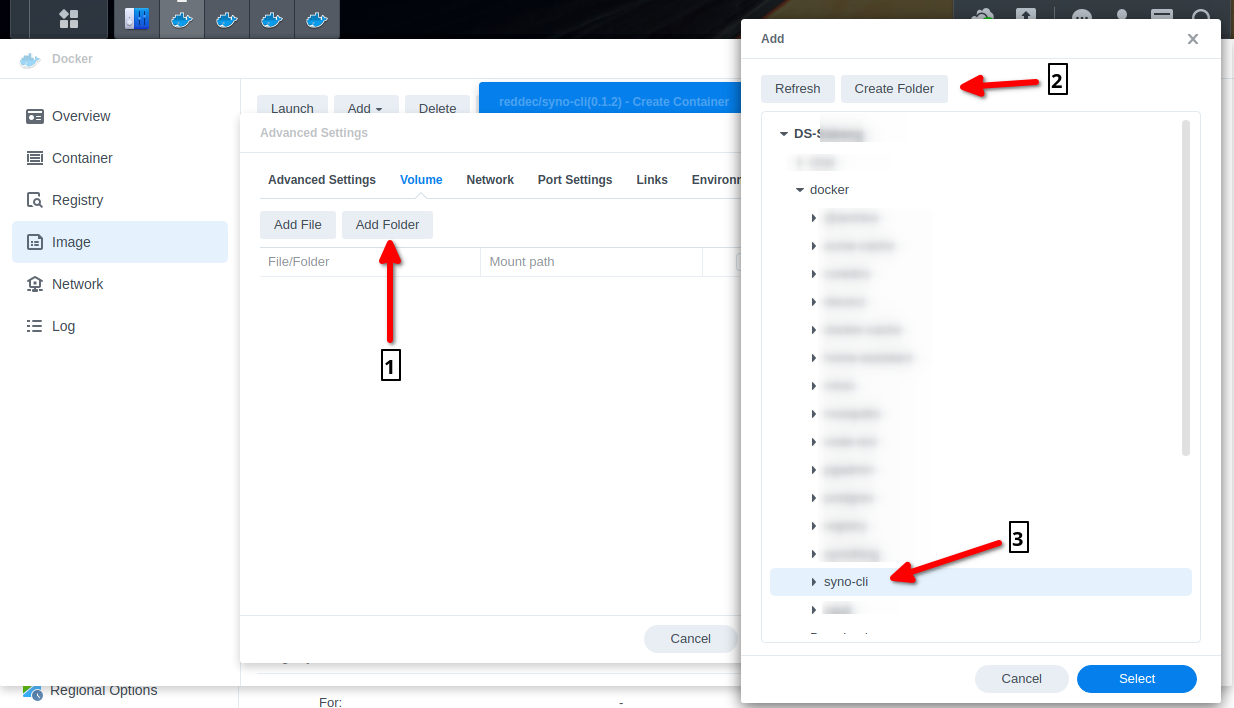
- Click tab Volume
- Click Add Folder
- Create new folder
- Pick it and click Select button
- In Mount Path write:
/var/syno
##
Environment
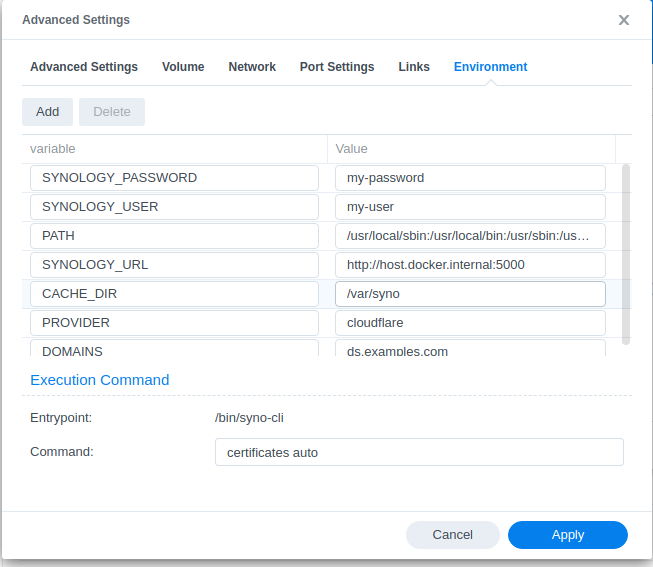
The following variables are required
SYNOLOGY_URL- should point to your NAS. If you didn’t change anything you may use the default one:http://172.17.0.1:5000SYNOLOGY_USER- admin user nameSYNOLOGY_PASSWORD- corresponding user passwordDOMAINS- comma (,) separated list of certificates domains (including wildcards)PROVIDER- name of supported DNS providers, in my casecloudflare<provider speicific variabls>- check required parameters here; in my case (Cloudflare) it isCLOUDFLARE_DNS_API_TOKEN- In the field ‘Command’ write
certificates auto
Leave the leftover parameters unchanged.
Notes
- User must be in ‘admin’ group or has admin prviledges
- Users with enabled OTP are not (yet) supported
- You should be a domain owner or at least authorized person to modify DNS records
- Be careful: in case of too many failed attempts Let’s Encrypt will ban you for hours
When you are done filling up the variables:
- push the ‘Apply’ button
- finish the wizard by clicking ‘Next’ then ‘Done’
##
Ensure the progress
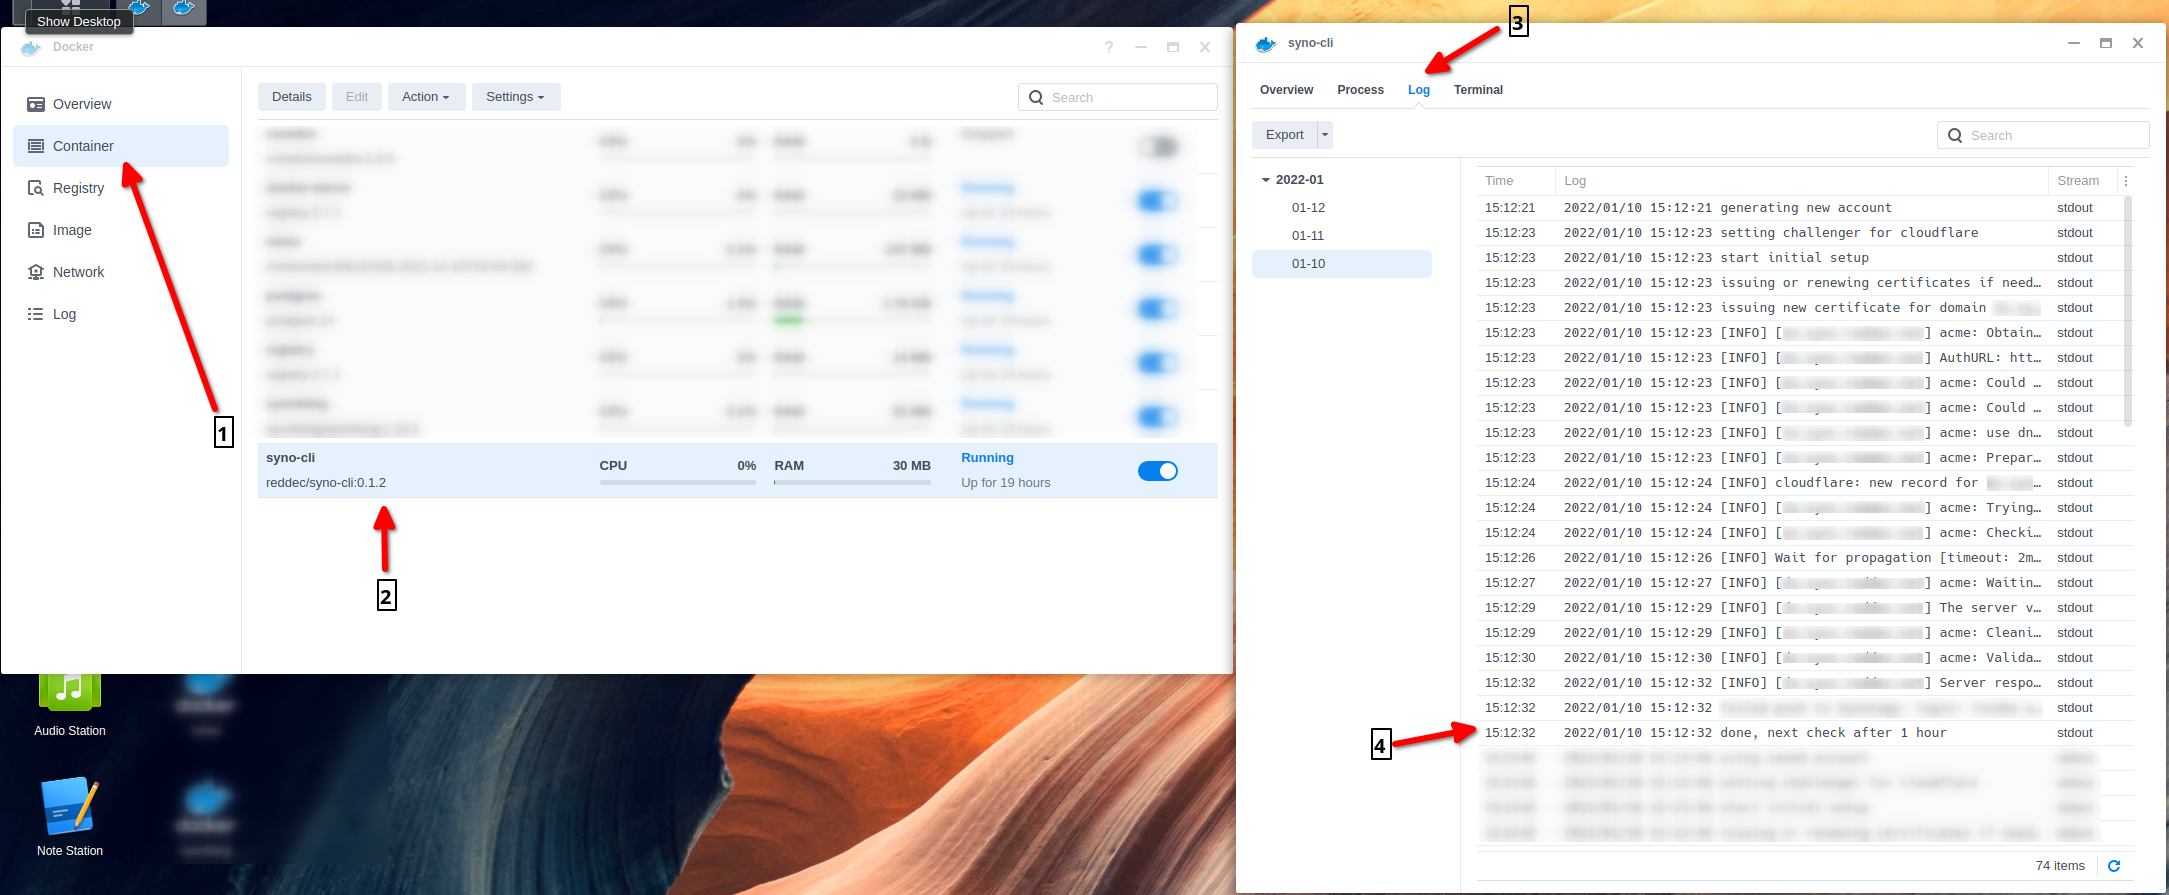
To ensure that the container is up and running
- Click on ‘Container’ tab, ensure that the created container is in ‘Running’ status
- Double click the created container (
syno-cli) - Click on Log
- Check that the process has completed without errors (click the small button on the left bottom corner to refresh logs)
Congrats! From this moment your certificate is already issued and installed to DSM.
Certificates will be automatically renewed.
##
Use certificate
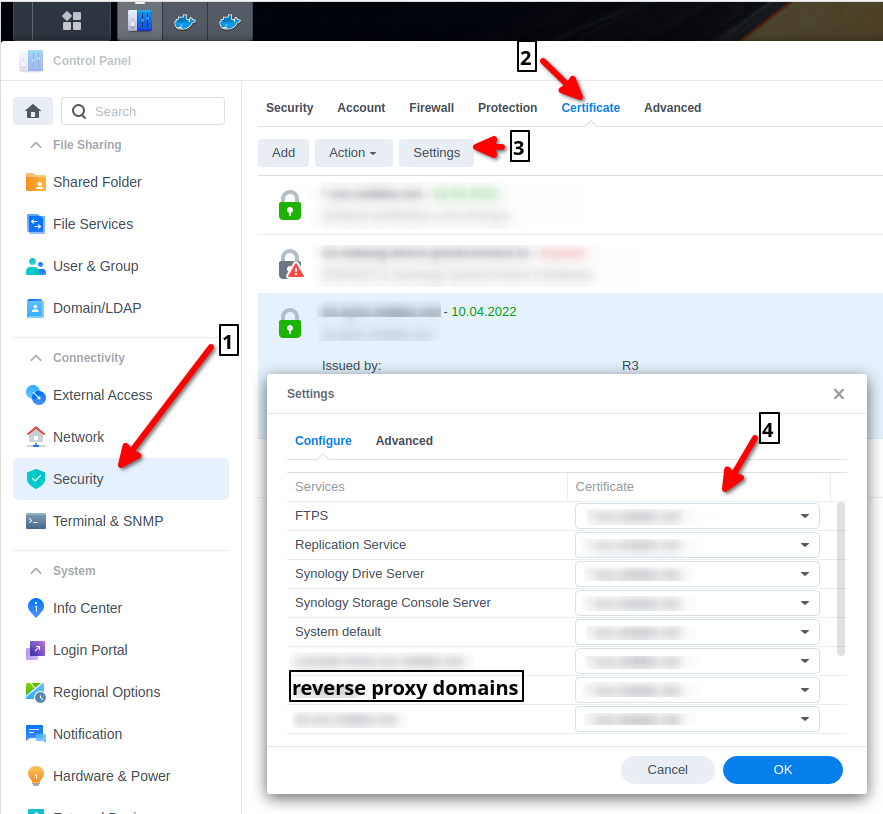
To use certificates for DSM UI, reverse proxies (yes, Synology supports it too), etc…
- Open Control Panel and click ‘Security’
- Click on ‘Certificate’ tab, you should added certificate, singed by R3 (Let’s Encrypt)
- Click on ‘Settings’
- Assign certificate to specific service (or as System default)
#
Summary
It may look complicated now but, as soon as you get familiar with Docker, the steps will become trivial.
There are already several ways on how to issue certificates by other means:
- Manually:
- Pros: trivial
- Cons: no auto-renewal, a lot of manual changes
- Scripts on DSM (acme.sh)
- Pros: automatic renewal
- Cons: no guarantees from Synology that those scripts will work after update, fragile configuration, not user friendly, separated steps for initial issue and renewal, manual configuration for cron (Recurring tasks)
- Native Synology Let’s Encrypt - use it if you can!
- Pros: supported by Synology
- Cons: works only if you exposed Synology to the public network (ie: HTTP-0 or TLS challenge)
The proposed solutions are supposed to be:
- User friendly (ie: no need to go to the console, set up tasks, etc…)
- Automatic issuing, renewing, and installing without additional configuration
Obviously, the approach still requires some kind of technical knowledge such as how to register the domain, how to install packages, and so on and I do not yet know how to make it simpler with the current limitations.
Good luck and enjoy safe browsing!